Home » Recipes » Page 10

Category: Recipes

RV Cookin’

Tangy Honey Slaw

This tangy Cole slaw can be used as a side dish or you can add protein for a complete lunch.

I use local Texas honey, Texas olive oil, and a good apple cider vinegar with the “mother”.

A huge plus of this salad is that it will last two weeks in the refrigerator! Talk about a time saver!

So, invite some friends over ( it serves 12) or enjoy it as a quick side on summer nights for you and your specials.

Tangy Honey Slaw

Prep Time 10 minutes
Cook Time 6 minutes
Servings 12

Ingredients
  

  • 1 large head cabbage
  • 2 large Texas sweet onions
  • 1 cup Texas local honey
  • 1 cup apple cider vinegar
  • ¾-1 tbsp salt
  • 1 tsp dry mustard
  • 1 tsp celery seed
  • ¾ cup EVOO

Instructions
 

  • Shred cabbage and onions in a food processor.
  • Mix Honey, vinegar, salt, mustard, and celery seed and oil in a saucepan and bing to a rolling boil.
  • Pour over cabbage and cover immediately.
  • Chill 2-4 hours

Video

Notes

Will keep up to two weeks refrigerated.

All day Smoked Shoulder Clod

Feeding a crowd? Have a day to slowly cook a beautiful piece of meat? This may be the recipe for you! Shoulder Clod is typically one of the least expensive cuts of meat and when a tasty rub is applied and it is slowly smoked all day long – you have a winner!

This recipe is inspired by Tom Perini’s herb rub (available online). It is fork tender when done – and becomes a very impressive main dish to serve a gathering.

The meat is placed in the smoker for an hour, then wrapped in foil for the remainder of the cook time. George suggests one hour for every two pounds of meat in the smoker.

When complete, remove it from the smoker, let it rest a few minutes, slice and serve. So, very little to do at the time your guests are ready for dinner.

Put on your cowboy hat and give it a try!

All day Smoked Shoulder Clod

Prep Time 10 minutes
Cook Time 8 hours

Ingredients
  

  • Large shoulder clod roast
  • 1 tsp dried oregano leaves
  • 1 tsp dried thyme
  • 1 tsp paprika (can use smoky)
  • 1 tsp salt
  • ½ tsp garlic powder
  • ½ tsp onion powder
  • ½ tsp white pepper
  • ½ tsp coarsely-grounded black pepper
  • ¼ tsp cayenne pepper

Video

Oven Baked Tortilla Espanola

In 1690, the Spanish headed to East Texas after news of La Salle’s French settlements. Here they encountered the Caddo Indians, who they called “Tejas”. This was derived from the Caddoan word for friend and pronounced: “Tay-yas”
Spain forever left its mark on Texas.

Tortilla Española, or Spanish omelet, is hands down the most commonly served dish in Spain. The quintessential tortilla contains potatoes and onions. It is a healthy, and filling meal you can prepare in no time- 10 minutes of prep using just a few ingredients . I like this version because you simply place it in the oven for 30 minutes, then add the beaten eggs and reinsert into the oven for 20 minutes.

I added sliced Spanish Chorizo on top for color and additional taste. You can get creative, adding red peppers, asparagus, and even other proteins including ham or tuna fish.

The omelette may be eaten hot, at room temperature, or cold. In Spain it is commonly served as a tapa at room temperature. As a tapa, it may be cut into bite-size pieces and served on cocktail sticks.

So, prepare it for dinner, serve it with a side salad and pop leftovers in the fridge for snacks or a quick lunch. I really like a tomato salad as a side – perfect for summer!

Oven Baked Tortilla Espanola

Prep Time 10 minutes
Cook Time 45 minutes
Servings 8

Ingredients
  

  • 28 oz Gold Potatoes, 1/4 inch slices
  • 2 White onions, chopped
  • ½ cup EVOO
  • 12 eggs
  • 1 tsp garlic powder
  • 1 tsp sweet paprika
  • 1 tsp salt
  • Pepper to taste
  • Optional: Add 8 ounces thinly-sliced Spanish chorizo

Instructions
 

  • Preheat oven to 375 degrees.
  • Add the sliced potatoes, diced onions, garlic, salt and pepper, and olive oil into a bowl, mixing well.
  • Layer the ingredients into a baking dish (I like a cast iron frying pan). Place in oven for 30 minutes
  • Add the eggs to a bowl and whisk. Stir in the paprika.
  • After 30 minutes pour the eggs onto the potato and onion mixture. If using Spanish Chorizo, layer on top. Bake for another 20 minutes.
  • Remove from oven and serve with a salad.

Video

Mom’s Chocolate Pie

Click here to watch the video!

This simple piece of tape says so much – I pulled out this pie plate and there it was: My Mom’s name on the bottom of the pie plate. This means she brought a pie to our house at one time. (and I forgot to return it).

It also reminds me that this pie plate went to the home of friends in need – my Mom was always one of the first to show up. It also went to church potlucks and dinner club gatherings. This piece of tape will stay on this pie plate as long as it will adhere.

Thanks Mom, for all you taught me! By the way – chocolate pie was her favorite desert!

Using an HEB refrigerator crust makes this pie a snap. It is simply making the chocolate custard (using water instead of milk) with 7 ingredients that you probably have in your pantry. Give it a try – even if you have to make your own Mother’s day desert – you’ll be glad you did!

Mom's Chocolate Pie

Prep Time 10 minutes
Cook Time 6 minutes
Servings 6

Ingredients
  

  • 1 cup sugar
  • cup baking cocoa (I use dark)
  • ¼ cup all-purpose flour
  • ¼ tsp salt
  • cups water
  • 1 tbsp butter
  • 1 tsp vanilla extract
  • 1 backed pastry shell - 9"
  • whipped cream for topping

Video

Notes

I like to use the dark cocoa, but regular is great as well. You can also double the vanilla (which I tend to also do)

Blueberry-Grapefruit Salad

 
This is the perfect spring salad! I love it when 2 seasons collide – when you can still buy Texas ruby red grapefruit and blueberries are abundant. Add mint, a little honey, and you have a colorful, flavorful salad.

This is as easy as slicing 2 grapefruits 6 ways, remove from skin, then divide each section into 1/4’s. Throw in a carton of blueberries. Remove mint leaves from stem and slice into 1/4” pieces. Slightly stir the mint and honey in the fruit and Voila! Its a color explosion!

You can even throw this on top of some salad greens for a lunch salad.

Blueberry-Grapefuit Salad

Prep Time 5 minutes

Ingredients
  

  • 2 large Texas grapefruit
  • 1 carton blueberries (about 2 cups)
  • 3 large sprigs fresh mint
  • 2 tbsp Texas local honey

Instructions
 

  •  Cut grapefruit in six sections. Using a serrated edge knife, remove meat from skin. Cut sections in 1/4’s and add to bowl.
  • Add blueberries
  • Remove mint leaves from stem. Stack on top of each other and slice into 1/4 in pieces.
  • Add mint leaves to salad and stir in honey.

Video

Spanish Mission Trail and Salmorejo Soup

Spanish Mission Trail and Soup

This next Texicureans adventure is full- out-fun. We biked the Spanish Mission Trail, stopped at a brewery, and topped it off learning how to make authentic Spanish soup from Maite Aguirre-Ortega. Our loyal readers may have noticed a trend in these articles. Texicureans’ mission is sharing the rich history of Texas by way of food. That’s why we are reporting back from unique to Texas locations and pairing them with cultural recipes. We hope to give you a glimpse of adventure and inspire you to join the journey.

Biking the Spanish Missions

I live for exercising outdoors and I’m a student of Texas history. Combine the two and I’m hooked. I bike this trail every year in the beautiful Spring air; it’s the best time to go in my opinion. From the moment you hit the trail, you immediately leave the noise of the city and enter a quiet, almost rural scene.

The San Antonio Missions are a National Park Service site, and the only UNESCO World Heritage Site in Texas. The trail is wide along the San Antonio River with small elevations and markers to guide riders. My perfect day is to head south on the Riverwalk Trail to visit three of the missions: Mission Concepcion, Mission San Jose, and Mission San Juan (about a 16-mile round trip).

Each Mission has its own distinct beauty and stories. Remarkably, all four of the mission sites still contain active catholic parishes! If you hit it right, Mission San Jose, the Queen of the Missions has ranger led walks at 10 am and 11 am. Ranger-led talks at Mission San José are offered at 2:15 pm and 3:15 pm. These talks last for 15-30 minutes and can give you a great overview of the park.

Typically, I tour the missions on the way down the trail and opt for a straight return trip back up to the King William Area and Blue Star Arts Complex to return the bikes.  A welcome site is the Blue Star Brewing Company Restaurant.  With outside seating you can still enjoy the spring air while dining.  A perfect ending to a perfect day!

Tip: Rent your bike

The first time we took our own bikes, but ended up with flat tires, so now I park right in front of Blue Star Bicycling Company and rent one of their well-maintained bikes for a day.  They have a choice of several styles, including e-bikes and cruisers.  They will fit you for the bike appropriate for your size and provide a basket for snacks or picnic items. There is a 5-pound limit for safety purposes – I learned this and had to leave a few items behind.  Be sure and bring water – a holder for water bottles is on each bike as well. I recommend arriving by 10:00 AM or so to rent your bike.  This will assure bikes are available for your party.  It will also give you plenty of time to tour the missions – which I never tire of exploring. 

While the historic beauty of the missions is breathtaking, the taste of an authentic Spanish recipe prepared at home is transformative. Food is family. Family is culture. Culture is history. So, come along with us into the kitchen where we learn how to make Salmorejo.

Salmorejo Soup

In the kitchen with Maite Aguirre-Ortega from Alsasua, Spain, we learned how to make her favorite warm day soup – a chilled tomato soup called Salmorejo. Requiring only ripe tomatoes, olive oil, garlic, and bread – this recipe is a snap to make in a blender.  If you use the optional toppings of diced hard-boiled egg and serrano ham, you have a meal. The full recipe and video tutorial can be found on www.texicureans.com.

Maite shared she has yet to visit the Missions that her homeland established so many years ago but plans to go soon with her new bike! She now lives in Austin with her native Austinite husband, Ryan. Not surprisingly, they say a Texas version of Salmorejo would be to add brisket as a topping. Sounds great to us! Que Aproveche! (Let’s eat!)

Salmorejo

Prep Time 20 minutes
Cook Time 5 minutes
Course Soup
Servings 4

Ingredients
  

  • 8 red, ripe tomatoes (2.5 lbs)
  • 7 oz stale bread
  • 1 cup EVOO
  • 1-2 garlic cloves
  • 1 pinch salt
  • 2 hardboiled eggs
  • diced Derrano ham or other cured ham

Instructions
 

  • Dice tomatoes.
  • Pull the bread apart into pieces.
  • Place the tomatoes in a blender and blend until completely pureed.
  • Pour the blended tomatoes into a colander using a steel spoon to clean the blend from the tomato seeds.
  • Put the bread in the blender and pour the clean tomato blend on top of it. Let sit for 10 minutes.
  • Add the garlic, olive oil, and salt. Blend until smooth.
  • Refrigerate for 2 hours (this is the hard part)
  • Serve the Salmorejo with hard-boiled egg and cured Spanish ham, or prosciutto. Note to Texans: Chopped brisket works great!

Video

Notes

  • Notes from Maite:
  •  
  • Tomatoes: The key to a good Salmorejo is to use fresh and very juicy tomatoes. We like using vine tomatoes but you can also use pear tomatoes.
  •  
  • Olive Oil: The recipe calls for a good amount of olive oil and so its important to use a god quality product. The olive oil can really change the flavor of your Salmorejo, so we encourage you to find your favorite one. Buying EVOO is a good rule of thumb. For our recipe we used Dominos Oil from South of Spain. We bought it online from a shop called The Olives Market in Buda, TX.
  •  
  • Garlic: Even if we love it in Spain, garlic is not for everyone. Feel free to start your recipe garlic free if you prefer. Don’t allow this small ingredient stop you from tasting one of the best cold soups that exists: If you like garlic - between one to two cloves gives you that perfect garlic punch that we adore in our palates.
  •  
  • Bread: the reason behind Salmorejo’s thick texture. For our recipe we used French Bread from HEB, stale bread or any bread with a dense crumb ratio will work. And remember, if you want a thiner soup just put less bread but if you want a ticker one, go wild. Just know that it’ll make your blender work double!


Spring calls for coconut cream pie!

Spring just calls for a coconut cream pie!

Until you’ve enjoyed a homemade version – you really haven’t tasted a true coconut cream. The coconut outshines the sugar to leave you satisfied without that sweet bite. This recipe doesn’t really take long: I buy the shells that you unroll and bake from the dairy section of HEB.

To increase the coconut flavor, I added 1/2 cup of coconut milk to the 3 cups whole milk. The pie holds up really nicely when sliced – making a lovely presentation. A dollop of whip cream completes the taste sensation.

Click this link for a short video on how to prepare

Coconut Cream Pie

Prep Time 30 minutes
Cook Time 20 minutes
Course Dessert
Servings 8

Ingredients
  

  • 1 pastry shell
  • ½ cup flour
  • ½ cup coconut milk
  • 3 cups whole milk
  • cup sugar
  • 1 pinch salt
  • 1 cup unsweetened fine coconut
  • 3 slightly beaten extra large egg yolks
  • 4 tbsp butter
  • 2 tsp vanilla extract
  • ¼ tsp pure almond extract

Instructions
 

  • Prepare and bake pastry shell
  • Scald the milk in the microwave approximately 5 minutes
  • In a saucepan, combine the flour, sugar, salt and coconut.
  • Over medium low heat, slowly add 1 cup of the scalded milk, whisking constantly until thickened. Continue this process one cup at a time until gone.
  • Pour about 1/2 cup of mixture into beaten egg yolks and whisk constantly. Pour this back into the pot.
  • Stir in vanilla, almond, and butter.
  • Cool mixture and pour into pastry shell.
  • Refrigerate and serve topped with a dollop of whipped cream.

Tex-Mex Meatballs

You’ve always heard about Meatballs and you think about that being an Italian dish. But, guess what: there’s a Tex-Mex version! And guess what else: It’s a one skillet dish! So, make this recipe, make a salad and you have dinner.

As long as I’m messing up the kitchen, I like to double this recipe for a later meal. I froze this recipe to take to a friend who was having a medical procedure a few days after preparation. It thawed out and reheated in the microwave like a charm.

A mixed green salad with avocado, onions, and a few crumbled chips is an excellent accompaniment.

Go Tex-Mex!


Tex-Mex Meatballs

Ingredients
  

  • 2-4 tbsp Texas EVOO
  • ½ cup onion, finely chopped
  • 2 jalapeños, seeds removed and finely chopped
  • 2 cloves
  • 1 tsp each cumin, smoked paprika, and oregano
  • ½ tsp salt
  • 1 lb grass-fed ground beef (preferably Texas beef)
  • ¼ cup crushed tortilla chips
  • 4 tbsp cilantro, chopped
  • 1 28 oz can fire-roasted tomatoes
  • 1 tbsp Adobo seasoning
  • ½ tsp sugar
  • Freshly squeezed lime juice and chopped cilantro, for serving

Instructions
 

  • Heat 1 TBSP of olive oil in a large skillet over medium heat. Add the onion, garlic, and jalapeños. Saute until softened, about 5 minutes. Add the cumin, smoked paprika, oregano and salt. Cook for another 2 - 3 minutes or until fragrant. Transfer the mixture to a plate and place it in the fridge to cool.
  • Once cooled, combine the sautéed vegetables with ground beef, crushed corn chips, and cilantro. Use your hands or a cookie scoop to roll the mixture into a 3 - 4 TBSP meatball, yielding about 12 meatballs.
  • Wipe out the skillet and return it to medium heat. Add another 1-2 TBSP of olive oil. Add the meatballs and cook until browned, about 2-3 minutes per side. Transfer to a plate and set aside
  • To the skillet, add the tomatoes, Adobo seasoning, sugar, and pinch of salt. Bring to a boil and add the meatballs. Reduce the heat to low and simmer gently for 5-10 minutes, until the meatballs are cooed through, but still a little pink on the inside.
  • Serve warm with a squeeze of lime and chopped cilantro.

Video

Notes

When sealed in an airtight container, the meatballs and tomato sauce will keep for 4-5 days in the fridge and up to 2 months in the freezer.
I like to double this recipe - perfect to put one recipe in the freezer for another meal.

Ground yourself in the garden

When is the last time you stood outside, boots digging into the earth, and soaked in the colors all around you?

Gardening is grounding. Literally. There is beauty in the dirt. It’s that time of year when sunshine warms the air, and our thoughts turn toward new beginnings. It’s a time-honored metaphor for life. We plant the seeds, water them, and watch them grow. But for those of us who love the garden and the peace and nostalgia it brings forth; we know there is much more inspiration there.

I have been gardening since I was a little girl, shadowing my grandmother on her half acre garden at the farm in Dimebox, Texas. Every time my hands are in the dirt, I’m transported back to that place for just a moment. As Texans, we know every child should get a chance to spend time outdoors. It’s where some of the best lessons are. Put in the work and you might see the fruits of your labor. Even if your crops fail, the toil helps to build our character. The peace outside away from technology connects us to the earth and humbles us.

Few things are better than stopping to smell that bright flower that pushed through to reflect radiant color back toward the sun that fed it.

This Spring, Texicureans invites you to play in the dirt! We are giving you two routes to take for some adventure. Visit the San Antonio Botanical Garden to learn from the experts, take in the beauty, and grab a bite. Or are you looking to try something new in your own back yard? A “lasagna gardening” technique tutorial might be for you. We did both and we are here to report back!

San Antonio Botanical Garden

I hadn’t been to the San Antonio Botanical Garden in years. And, wow, have they created wonderful new additions! The whole day was a delightful experience. SABG has a beautiful new section dedicated to culinary gardening and a restaurant offering a full menu and wine list.

We started the day by getting some insight from Andrew Labay, their Director of Horticulture.

“April is by far one of the best times to plant plants in the garden in a general sense: whether it be vegetable garden, ornamentals, or trees. This is a time we transition from our cool season crops to our warm season crops. Things like tomatoes, okra, tomatillos, eggplant, squash, and peppers of all type – it’s a great time to plant those items,” says Andrew.

Andrew invites you to come enjoy their one-acre vegetable garden. With a chef on staff and an outdoor kitchen they can pull items right out of the garden and display different recipes. If you’re interested in planting ornamentals, the Botanical Garden is opening a brand-new water saver garden which features over 100 different types of native and adaptive plants that are great for Texas and help save water in the landscape.

When you visit SABG, I highly suggest you stop at their farm-to-table café, Jardin. We sat on the patio, surrounded by tulips and rosemary listening to soft music. Our divine plates came out and we were transported to a European café right in South Texas for a little while.

Lasagna Gardening:

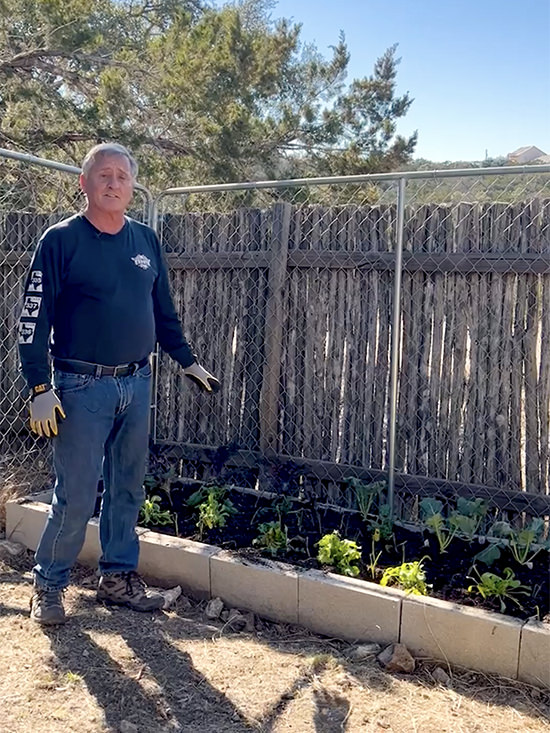
Back to reality in my own yard, my mind is focused on vegetables. A new technique has piqued my interest this year: low maintenance “lasagna gardening”. Bob and Karen Taylor, who live in the rough and tumble Hill Country have utilized this method successfully for several years.

Lasagna gardening is a no-dig, no-till organic method of gardening that results in rich fluffy soil. Advantages of this method are fewer weeds, better water retention, less need for fertilizer, and loose soil that is easy to work. Bob and Karen are also passionate about the benefits of composting. Are you compost curious?

Composting returns important nutrients to the soil. It reduces your household trash. It’s better for the environment. When kitchen scraps go to the landfill, they create methane. When composted, they do not. Essentially, you need a balance of nitrogen (greens – including food scraps, coffee grounds, tea bags, fresh grass clippings) and carbon (browns – which can be dry leaves, straw, paper napkins, and newspaper).

For the “Lasagna Garden” recipe and for specific information on how to compost – see the recipe below:

Texicureans has given you two routes to take to ground yourself in the garden this Spring. So, friends, ask yourself this: What do you want to grow?

Recipe for Composting

Reasons to Compost:

Compost returns important nutrients to the soil. It reduces your household trash. It’s better for the environment. When kitchen scraps go to the landfill they create methane. When composted they do not. Saves money! Instead of purchasing compost, you make your own for free.

You need to have a balance of nitrogen (greens) and carbon (browns):

Greens include:
Food scraps
coffee grounds
tea bags
fresh grass clippings

Browns include:
dry leaves
straw
paper napkins
newspaper

You can also compost:
eggs shells
hair
nail clippings
wool
pure cotton
manure

You should not compost:
meat
dairy
bones
pet feces
diseased plants
magazine paper

If you have an open compost pile, be sure to cover your greens with browns to prevent odor and pests.

It’s good to throw some soil or manure in your compost pile/bin from time to time as it will introduce more organisms to your compost.

You need to make sure the compost is properly hydrated, not too dry and not too wet. It should feel like a wrung out sponge.

Compost should be turned at least once a week to aerate it.

Finished compost takes a few months. It should be dark brown, crumbly and have an earthy smell.

Recipe for Lasagna Gardening

Lasagna gardening is a no-dig, no-till organic method of gardening, that results in rich fluffy soil. It’s best to start in the fall, but can be planted immediately if you started late.

Advantages of Lasagna Gardening are:

• Fewer weeds
• Better water retention
• Less need for fertilizer
• Loose soil that is easy to work

Equipment/Tools you’ll need:

• Garden hose
• Shovel
• Gardening gloves

Materials you’ll need:

• Cardboard or newspaper
• Brown leaves (optional)
• Compost
• Manure
• Peat moss
• Mulch
• Cinder blocks, rocks or other material to create raised beds

Process:

• Create the side of your beds, they should be about 18” deep.
• Line the bottom with cardboard or newspaper (No need to take out weeds and grass as this will create a weed block)
• Start layering material in 3” to 5” layers, starting with the brown leaves, followed by compost, manure and peat moss. After plants are in end with a layer of hardwood mulch. Water well and you’re done!